What have you learnt about technologies from the process of constructing this product?
We had had practice with a lot of our technology during out AS media course.
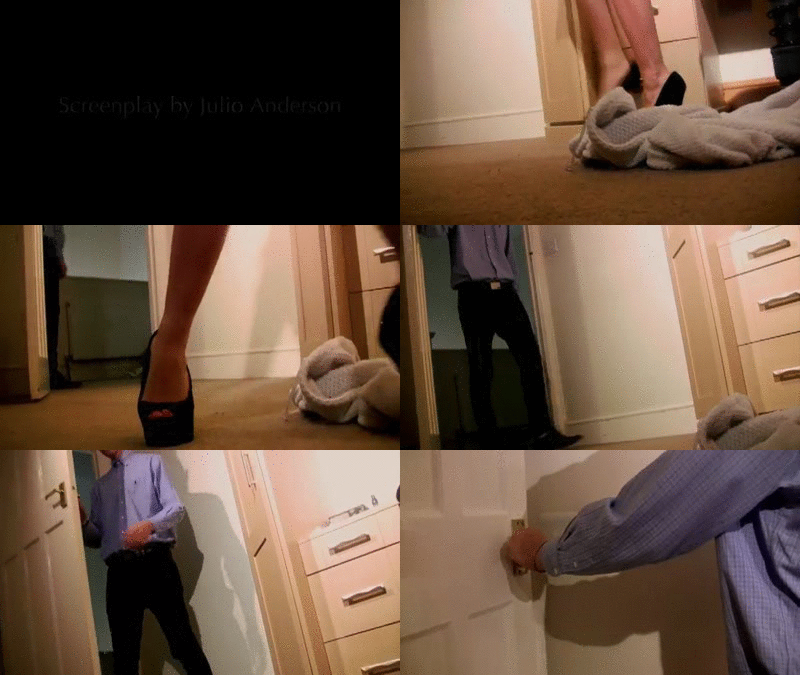
For this shot, the person filming had to be on the floor, and manually tilt the camera upwards; the camera being light and portable was essential.
For this shot, easy portability was also crucial, as the movement was tricky, and from a very low angle - again, the camera was very close to the ground - actually mounted upon a few large books.
At one point during our first shoot, the person filming (Enya) even had to sit inside the wardrobe, as we miscalculated the dimensions of our set.
This light and portable aspect also helped in the transportation process to the set, especially with large and heavy lighting kits.
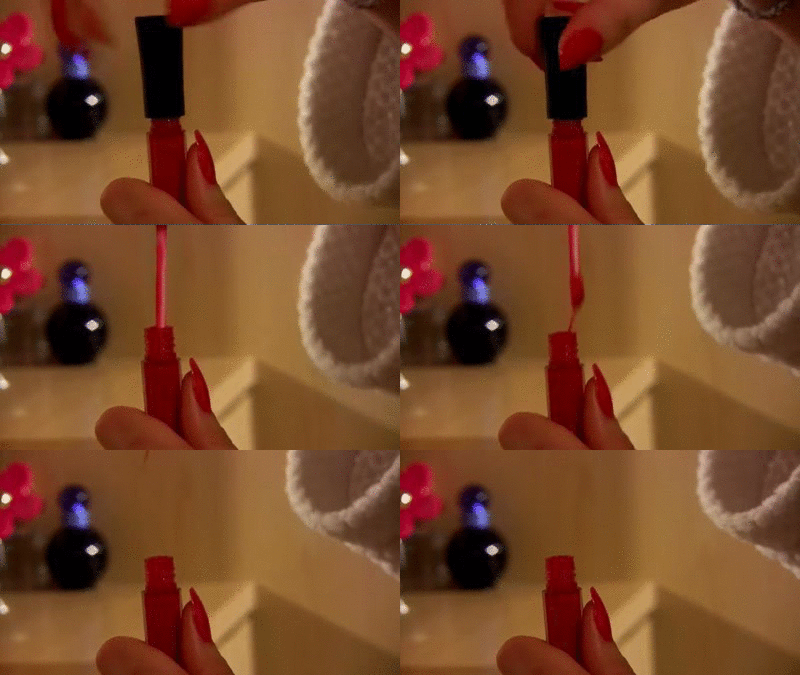
In this shot, getting the detail of the lip gloss dripping out was essential as it was the whole point of our shot: we wanted such detail that it was almost gruesome (with the connotations of blood) - setting our dark undertone in the atmosphere. As you can see, there were other objects in the shot, however with many attempts at manual focus, we finally got the detail focus solely on the lip gloss.
Hardware:
We used a Canon HV30 to film our film opening:
Advantages:- Light and portable - allows a variety of different shots, including handheld, and a variety of angles and positions. This aspect was especially useful in shots like these:
For this shot, the person filming had to be on the floor, and manually tilt the camera upwards; the camera being light and portable was essential.
For this shot, easy portability was also crucial, as the movement was tricky, and from a very low angle - again, the camera was very close to the ground - actually mounted upon a few large books.
At one point during our first shoot, the person filming (Enya) even had to sit inside the wardrobe, as we miscalculated the dimensions of our set.
This light and portable aspect also helped in the transportation process to the set, especially with large and heavy lighting kits.
- Simple and easy to understand: we had tutorials and lots of practice with the camera, and so did not have a problem using it on set, which saved us a lot of time.
- The footage produced was in High Definition - the LCD screen allowed for a good standard of resolution; especially useful in shots like when we film a perfume spray and lip gloss dripping, where fine detail is essential.
- The fact we could watch back all of our footage there and then on Viewfinder also allowed us to evaluate each of our shots, and change things like the framing, acting or set accordingly.
- Little things like the Viewfinder screen swiveling around made it easy for the actors to see the framing, allowing them to act accordingly.
- The shotgun mic and headphones allowed background noise to be minimal,which was particularly useful as we were filming in a house where people were around downstairs and making noise. The headphones allowed us to listen and listen back to the sound, ensuring that we captured footage with our desired quality of sound.
- Not only was there auto focus, which allowed our shots to be focus and clear - what we visually desired, but there was also the option of manual focusing, which we used a lot. Particularly in these shots, where focus on one particular object was crucial:

Here, we used manual focus, as there is a lot of objects in the framing, like the actors hair, and the objects on the dressing table. We had difficulty using auto focus to get sole, detailed focus on the picture, and so achieved this using auto focus. Focus on the picture here was crucial as the audience should be intrigued by the photo and the two girls in it, perhaps even recognizing out protagonist; this was necessary as it allowed our audience to piece together the story line .i.e. our whole story line follows our protagonist tracking down her beloved sister to save her.
Once the dressing gown falls to the ground, we used manual focus to focus in on the detail of the dressing gown. We really liked this effect, in fact coming across it by accident on our test shoot, and enhanced the idea/effect during our following shoots.
The tripod we were given was also very useful, and allowed simplistic, steady shots. For example, the first shot was done on a tripod, and is smooth and steady, however the second shot was not, and is not smooth or steady:
 |
| First shot: smooth and steady |
 |
| Second shot: unstable |
It was easy to adjust, and we had experience and a tutorial on adjusting the tripod. We used the tripod for the majority of our shots, to get a steady shot, and were still able to adjust it to get shots at angles. For instance, some of our shots were at a high angle, and we simply adjusted the tripod to allow us to alter the positioning:
 |
The camera positioning we
used for this shot on our first shoot: |
 |
| Our shot - over-the-shoulder, low angle shot: |
- The tripod and the cameras adaptability made it easy to get shots like the one below, where we had to put the camera at an angle, on the dressing table; with a bulkier camera, this may not have been possible, and without the tripod, we would have gotten a shakier shot, which we did not want.
Disadvantages to the Canon HV30 (and tripod):
- However, in the shot above, whilst the camera and tripod were positioned on the dressing table, when the drawer slammed shot, you are able to see that the camera and tripod shook. We did not necessarily mind this effect too much, as the film dissolve to the title made it less noticeable. This was a compromise we were happy with, rather than a handheld shot, where the impact of the slamming of the drawer might not have effected it, but it would be less stable.
- On the Viewfinder screen, footage appeared much brighter than it appeared on our computer; this caused us, on our test and first shoot, to make the lighting very dark, when in actual fact, on the computer screen, the shots looked dark enough.
- The quality of our footage was not ideal; the resolution particularly effected our film opening as we wanted to use dark lighting to create our sultry and mysterious atmosphere. However, we could not achieve this exactly as desired, as the footage appeared grainy if there wasn't enough light in the frame. We did not want grainy footage, as it would take away from our professional look and did not suit our film. We learnt that we had to have the right amount of light for our footage to be clear, and so on each shoot adjusted the lighting until our footage was clear:
We also used three 350 watt Gulliver lights to light our film opening:
We had difficulty with our lighting from the start. We wanted dark, mood lighting; creating a tone of mystery and a sultry ambiance. However, we had little to no experience as a group with lighting to create an ambitious ambiance. We were given a tutorial on how to light; using one light as a 'spot' light, to focus on the protagonist in our case, and another as a 'filler', to fill in all of the areas that were not lit. The third light could be used behind a person to give them definition and a slight glow, and we could adjust these with the dimmers accordingly.However, we had several initial difficulties:
We had a second tutorial for the lighting with our technician. He taught us a lot about lighting which helped us improve our footage:
- We must light from one direction, and try to keep all the light coming from this direction only as that will help with continuity between shots;
- We must light from very high up, which gave our shots a more naturally lit look, as it could be lights from the ceiling.
- We must use a lot of light, and we can always make our footage slightly darker with our grading in our after effects.
This tutorial was done in a room set up like our set, with a mirror and desk etc. and we were able to do lighting set ups for different shots ourselves. This really helped us to understand how to light our set with mood lighting, but also enough clarity for the camera to capture in our footage.
Software:
For grading, we used Abode Premier Pro and learnt how to grade the shots so that they suited our desired mood. I learnt how to use the 'Procamp tool' which allowed you to edit the brightness, contrast, and other visual aspects of the shot. I found a general setting that would suit all of the shots, and copied and pasted the setting onto all of our shots, to keep a continuous look. I then went through and edited shots specifically, for instance lightening shots that were darker than the rest, or making certain colors come out, using the 'three way color corrector' tool . For instance, in shots where there were red and other vibrant colors, I brought out the colours using the three way color corrector. Here is a short example:
Software:
For our titles. we used LiveType and Premier Pro. We learnt how to use this during our media year, and experimented with creating a graded look on our final title, to fit in with our dark and mysterious atmosphere:
To communicate efficiently as a group, we used methods, like
- Facebook - to create a group chat and have discussions whenever we needed to, as school time is limited.
- Google Drive - we used this as a way of creating a document that we could all edit at the same time, and that was available to all of our group on the internet. This was extremely useful and helped us in many of our presentations.
- We also used text messages and Whatsapp to communicate outside of school.

For editing our sequence together, we used Abode Premier Pro, and learnt how to effectively edit shots together, make them all continuous, for instance:
 |
| Continuity shot 1 |
We had to go through each shot, frame by frame, and find a point where the frames matched i.e. the action, although from a different angle, looks like it is in the same position as in the previous shot.
We also put a 'film dissolve' in for our transitions.
We also used how to use the 'razor' tool a section of a shot to make it slow motion:
We also used how to use the 'razor' tool a section of a shot to make it slow motion:
For grading, we used Abode Premier Pro and learnt how to grade the shots so that they suited our desired mood. I learnt how to use the 'Procamp tool' which allowed you to edit the brightness, contrast, and other visual aspects of the shot. I found a general setting that would suit all of the shots, and copied and pasted the setting onto all of our shots, to keep a continuous look. I then went through and edited shots specifically, for instance lightening shots that were darker than the rest, or making certain colors come out, using the 'three way color corrector' tool . For instance, in shots where there were red and other vibrant colors, I brought out the colours using the three way color corrector. Here is a short example:


No comments:
Post a Comment